|
|
|
|
|
Depth Sounder Installation (adapted from information provided from Steve Gross and Greg Delezynski)
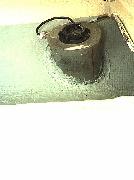
For a depth sounder location, if you want to avoid boring a hull in the bottom of your hull (always a thrilling adventure!) the alternative is to shoot the signal through it. First, you need to locate where you're going to put the sending/receiving unit. - Put it in a clear plastic bag and fill it half full of water. Secure the neck of the bag around the power cord with some rubber bands. Now you can try out different locations while underway and at anchor. Remember, your going to want to locate it on a part of the hull that will remain immersed in sea water when you're at a good angle of heel.
When you've decided where, mark the spot on the hull and guesstimate or measure the angle formed by a perpendicular to the curve of the hull. Then cut a piece of pvc pipe (with a diameter large enough for the sending unit to fit in to) at that angle you measured. The other end of the pipe should be a right angle, and will receive a PVC cap-end (drill a hole in
the cap and pass through the power cord). Use scraps of pvc to glue a resting point for the unit inside the pipe, and (of course) use pvc glue for this. Now your sending unit should fit inside like a happy marriage.
Take the sending unit out to glue the pipe to the selected spot on the hull with a 2-part epoxy that sets up in a reasonably short period of time. When the epoxy has cured, fill in the gaps between the lapstrake ridge of the hull and the bottom end of the pipe, using auto-body gel type Bondo (polyester resin). When the bondo is cured, paint the interior spot of the hull if necessary, so that the mineral oil you are going to fill it with doesn't get absorbed and disappear into the fiberglass of the hull. Fill the pipe with enough mineral oil to keep the unit immersed at an extreme angle of heel. Any non-volatile fluid would work but mineral oil won't deteriorate or grow
fungii. Don't permanently glue the cap, just use a bedding compound like Boatlife caulk. Maybe you can find a pvc threaded cap with adapter ring. In any case, use some of the boatlife caulk where the power cord exits the cap.
|
|
|
|
|
|
|
|
|
|
|
Getting the Proper Hook
Jill and I are in the process of a long refit of our Nor'Sea 27 Guenevere. A short time ago it came time to do something about our old and rusty ground tackle. Wow, it is a lot of work. And, once again I found how great a designer Mr. Hess is, and why I love having a 27 and not a larger boat.
On Guenevere we have always had two deck pipes to stow the anchor rode in the forward locker. In the past this has caused problems. The last anchor rode in has to be the first out next time. So, after removing all ground tackle, the first order of business was to divide the locker in to parts.
To divide the locker, first I put a small ¾ X ¾ board across the bottom of the forward bulkhead, on the inside of the anchor locker. Then I put two more ¾ X ¾ boards up from the bottom of the forward locker, centered and about ½ inch apart on the bulkhead to just below the locker door (also on the inside). I then made up a small board that was about a triangle to rest on the bottom ¾ board and jam against where the bow angle comes down. This forms the bottom of the port side anchor locker. I then made up two ¾ X 6 inch boards that slide down between the two upright ¾ X ¾ boards. These boards also jam against the bow angle running forward and aft. I then put a dowel rod across the top center of the locker, also running forward and aft. I then made up a small divider of two layers of sunbrella.
Next was the decision on what anchors and rode to use. As a sample, we looked to the Pardey's boats, and advice from other Nor'Sea owners, and decided on a combo of one 35 pound CQR, one 15 Kg Bruce, a Fortress FX-16 and another small Danforth for a lunch hook.
For the CQR, our main anchor, we decided to go with 300 Foot of ¼ inch High test chain followed by 20 foot of ½ inch line made fast to the locker bulkhead. NOT the hull. If the rode should run out uncontrolled I want the least amount of damage as possible. For aid in using all that chain, we decided to mark the chain with colors. We decide to use red, blue and green. As you anchor with a minimum of 3 to 1 when using chain, we decided to mark it at 33 foot increments. So at 33 foot we put one red mark, at 66 foot we put one blue mark, then at 99 one green mark. Then at 133 two red marks and so on till about 280 foot. At the 280 mark we put a long (about 3 foot) green mark followed by red the rest of the chain.
By the way, you can't just paint galvanized metal. It first must be etched for the paint to adhere well. To do this we found the area we wanted to paint, then splashed vinegar over it and let it sit for minute or so. Then washed it off with fresh water. Let it dry and paint. We have done this in the past with very good luck.
On the Bruce, We put 50 foot of ¼ HT chain spliced to 300 foot of ½ inch three strand line. The CQR and Bruce live on the bow
(Continued on page 6)
|
|
|
|
|
|